As of spring 2023 the Graduate School will recommend the implementation five specific criteria of digital accessibility so that all dissertations and theses can meet the Ohio State Digital Accessibility Standard starting in Fall 2023.
As of August 1st 2024, if students need access to Adobe Acrobat to run a digital accessibility checker on their dissertation or thesis, they can visit the visit the Digital Union (Macs only), Research Commons Computer Lab, and the public library sites at the Thompson Main Library and 18th Avenue Library.
The following five criteria have been added to the format check submission guidelines for dissertation and theses:
- PDF file includes full text
- PDF accessibility permission flag is checked
- Text language of the PDF is specified
- PDF includes a title
- Images, figures, and tables have descriptive captions and/or alt tags explaining content
Electronic Dissertation and Thesis Adobe Acrobat Download and Accessibility Support Video
OSU Login is required for access.
More information and links to resources to support students, advisors and programs with implementing digital accessible practices into the creation of electronic theses and dissertations can be found on the Document Preparation page.
For questions about requirements and support for OhioLink Electronic Thesis and Dissertation visit the OhioLink site.
For questions about the OSU Digital Accessibility Policy please contact OSU's Digital Accessibility Center.
“According to Ohio State’s Digital Accessibility Policy, all digital information and services to be used by faculty, staff, program participants, the general public, or other university constituencies are required to be compliant with the non-discrimination provisions of the Americans with Disabilities Act (ADA), as amended, and Section 504 of the Rehabilitation Act” (OSU's Digital Accessibility Center.)
For digital accessibility needs around content developed by the Graduate School please contact email grad-schoolaccessibility@osu.edu .
Running a checker from Word vs a PDF
When creating a dissertation or thesis there are several tools that could be used as word processing or content creation software. The Graduate School recommends using Microsoft Word but specific fields of study may have other applications that would be preferable. Either way, the Graduate School provides a basic template for students to use for their dissertation and thesis. This template attempts to serve as a starting point for formatting guidelines which will also help with digital accessibility guidelines. The template is not exhaustive, and it will require students to verify that their content is digitally accessible using some of the tools provided within Microsoft Office or other applications used to create content.
Software Resources
If you need support in using Microsoft Office please visit the resources page provided by OSU IT which links to support resources on how to perform basic functions within the software.
Ohio State IT Software Resources Page
Difference Between Checking in Word and Acrobat
The Graduate School requirements for digital accessibility are based on the five criteria listed above and can be checked in Adobe Acrobat. These checks can also be accomplished in Microsoft Word prior to saving as a PDF. When in Microsoft Word, a user can navigate to the “review” tab in the main navigation on the top of the screen and then select “Check Accessibility”. If you check accessibility, the software will provide you with multiple checks some of which fall outside of the minimum standards required. It is recommended that you attempt to resolve the majority of these accessibility issues regardless as it will provide a smoother transition to PDF.
ALT TEXT in Microsoft Word
The most valuable tool for Microsoft Office is the “Alt Text” checker which can be found in the same accessibility checker menu. This checker will look at images in a document and provide the user the ability to add descriptive text to each image. This is one of the most important elements of making a document accessible to others and it can also be the most time consuming. There is information below that provides suggestions and resources for helping write alternative text image descriptions. It is recommended that when you insert an image into your dissertation or thesis, you immediately right click, select “Alt Text” and input a description of the image. If a dissertation or thesis has several hundred pages and several images, creating alt text for all images after the document is complete can be a time-consuming process and create additional work at the final stages of dissertation and thesis approval and submission.
How to Download Adobe Acrobat Pro for Use with Your Dissertation or Thesis
To complete the process of making your dissertation or thesis ready for submission to OhioLink as a digitally accessible document, students will need to download Adobe Acrobat.
Student Access to Adobe Creative Cloud at Ohio State
There are various ways to access Adobe Acrobat as a student.
- Visit the Digital Union, Research Commons and Ohio State Libraries Public Computer Areas.
- Download a Free Trial
- Purchase a subscription to Adobe software products.
- Utilize a version you have access to due to your role as a student employee and or graduate associate.
Students needing to produce work using Adobe software such as a using Acrobat Pro to create a digitally accessible dissertation or thesis can download various software through it.osu.edu/adobe.
If you have questions about software offerings from Adobe please visit Getting Started with Adobe.
Note: There are two versions of Acrobat. Acrobat (Pro) and Acrobat Reader. Acrobat Reader will only allow users to view PDF files. It does not allow users to edit PDFs. Acrobat (Pro) is required to edit PDFs.
Setting Up the Acrobat Accessibility Checker
Setting up the acrobat Accessibility Checker is a process that should be completed after you have completed all revisions to your dissertation or thesis in the document creation software you are using.
Many of the checks that this checker will run apply to added formatting that in many cases will need to be completed in your document creation software such as Microsoft Word.
Find general support for Adobe Acrobat (Pro) concerning digital accessibility tools.
Specifically for dissertations and thesis here are tips for setting up the checker to meet the guidelines provided by the Graduate School.
- Open your dissertation or thesis PDF in Acrobat (Pro)
- On the right-hand side, you should see a “Tools” area. If this is your first time opening the application, you will need to click “More Tools”. This will open a list of tools with icons. Under the heading “Protect & Standardize” there is a purple icon of a stick figure in a circle with “Accessibility” under it. Select “Add” from the tab to add it to the side tools panel. Once this step is complete you can select the tab at the top of the screen that is your dissertation or thesis document.
- Select the “Accessibility” tool on the right-hand side tools panel. A new panel will appear on the right-hand side. Select “Accessibility Check”.
- A pop up window will appear that provides you with a few options to select.
- Check the box that says create “Create accessibility report”.
- You can choose where to save the report by selecting the “Choose” button and changing the file location.
- “Checking Options” is the area that is the most important as this is the area that dictates what types of checks the accessibility checker will perform. To meet the minimum standards for an accessible dissertation or thesis complete the check boxes in the following manner under each of the 4 categories in the drop box:
- Document (Following should be checked)
- Accessibility permission flag is set
- Document is not image-only PDF
- Text language is specified
- Document title is showing in title bar
- Page Content (No checks for this category)
- Forms, Tables and (No checks for this category)
- Alternate Text and Headings
- Figures require alternative text
- Document (Following should be checked)
- After you have checked to make sure the appropriate features are selected under each category select the “Start Checking” box to run the accessibility checker.
- Once the checker has completed a panel with open on the left-hand side of the screen that displays the results of the checker. Please see the next section on “Reviewing the Acrobat Accessibility Results” for next steps.
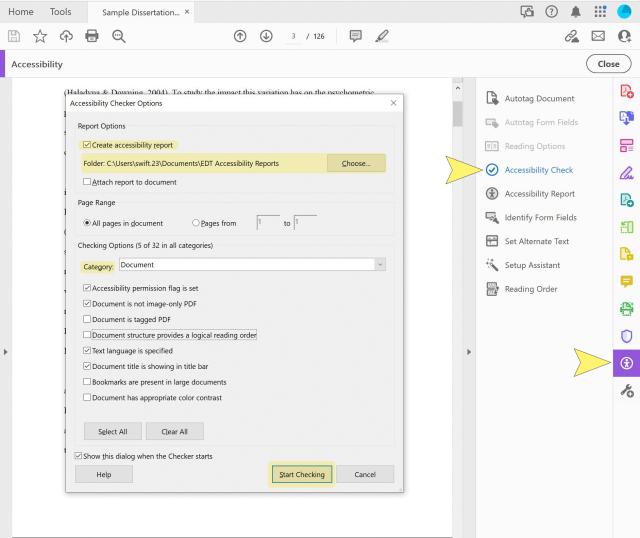
Screenshot of the Adobe Acrobat Accessibility Checker. Highlighted areas are marked to show the location of the accessibility panel, the accessibility checker, settings for generating a report, and settings categories location for setting up the various items to check described above.
Reviewing the Acrobat Accessibility Checker Results
After running the Acrobat Accessibility Checker a panel will display on the left-hand side that shows users what the checker has found. Alternatively, users can click the Accessibility Report link on the right-hand panel and see the report. If reviewing from the left-hand checker panel, there will be a number of categories with drop down accordion menus that then display different items that are checked under each category. There are three things too look for:
- Yellow Warning Symbol – “Skipped”
- This distinction shows that there are items that the checker did not check and may or may not be an issue with the document. At this time, these items can be ignored as they fall outside of the requirements for electronic dissertations and thesis.
- Red X – “Failed”
- This distinction means that the accessibility checked these criteria and there was an error that will require manual intervention to fix. This typically means that there are digital accessibility criteria that have not been completed prior to running the checker. The most common three failed areas are: *
- Primary Language
- This can be fixed by right clicking on the error, selecting fix, and setting the language to English and selecting “Ok”.
- Title Not Set
- This can be fixed by right clicking the error and then adding the title of your dissertation or thesis in the title box that appears. You may need to uncheck the “leave as is” box to be able to input your title. Click “Ok” once you have input your title to save it to the document.
- Alternative Text
- This can be fixed by right clicking the error and then adding a text-based description of the figure or image in the box. If the image or figure is simply decorative such as a graphic line divider, you can check the “Decorative Image Box”. As a note, it is better to describe all images by default for dissertations and thesis as they should rarely contain decorative images. If you need support for how to write alternative text for images, please visit WebAIM.
- This process may be needed for several images. The pop-up window will display an arrow and the number of images it detected, so you can walk through them and add the text-based description.
- * If you choose to correct these errors in Acrobat, make sure to save the document after fixing the errors, so that they are saved into the document.
- Primary Language
- This distinction means that the accessibility checked these criteria and there was an error that will require manual intervention to fix. This typically means that there are digital accessibility criteria that have not been completed prior to running the checker. The most common three failed areas are: *
Reviewing the Accessibility Report
Once a user has run the accessibility checker, an accessibility report should be available. When you select the “Accessibility Report” in the right-hand panel under “Accessibility”, a panel will open on the left showing the report. Also, if you selected a location to save the report during the checker setup process, you can go to that location on your computer and open the report.
The Acrobat Accessibility Report is a .html document that contains not only the report but links to resources for items in the report. For the majority of criteria that the report checks, there is a link to online information that can help users resolve the issue.
When turning in dissertation or thesis it is advised that you also attach the accessibility report as part of the submission. This will help speed up the format review process.
Tips for Incorporating Proper Figure/Table Captions, and Alt Text Descriptions
The format review process on the Graduate School website highlights specific ways that figures and tables should be captioned to meet formatting guidelines. This section is devoted to helping students with meeting expectations for the content of those descriptions.
As a beginning note, if you start by creating thoroughly descriptive text for your figures and tables, that text is typically acceptable to be used as alt text as well. Also, when you think about describing figures and tables or creating alt text, it is important to remember that this is for someone who will need a description of all content in a way that would help them understand color, layout, included text, and the most important details of what that figure, table, or image is communicating.
Example of poor description and alt text:
Table showing longitudinal results of studying orphans in film.
Example of thorough description and alt text:
Line graph demonstrating quantity of orphan characters in the top 20 box office films from 2001 to 2010. X axis is demonstrating year and y axis is demonstrating quantity of films with an orphan character. The chart shows a consistent percentage of 35% to 50% of films in each year with higher percentages in 2002, 2005, and 2008 and lower percentages in 2004, and 2009.
Tips for Figures
Figure caption text does not need to explain every element of a figure, but the caption should provide more than the title of the figure and if needed point to the page number where further discussion can be found.
Tips for Tables
Table caption text does not need to explain every element of a table, but the caption should provide more than the title of the table and if needed point to the page number where further discussion can be found. In most cases information about major columns and row labels should be included in the caption to provide more clarity.
Tips for Alt Text
Alt Text should incorporate the guidance provided for figure and text captions but also needs to consider all major text and layout. A good tip is to think of describing a scenic landscape to someone who has not seen it before. You would include a description of the sky, water, trees, etc. When describing your figure or table for alt text try to include the most important elements that would describe not only the textual information but the layout of that information.
Resource for LaTex Users
Some graduate programs utilize a software known as LaTex to produce their documents due to the flexibility in representing specific kinds of research materials. Michigan State University has produced a short guide concerning accessibility using LaTex as opposed to word. We recommend students explore this resource if they choose to use LaTex to produce their dissertation or thesis. Please be aware that this resource is for LaTex support only and does not cover specifics concerning Ohio State dissertation and thesis requirement.
Still Have Questions?
Dissertations & Theses
614-292-6031
grad-schoolformatreview@osu.edu
Doctoral Exams, Master's Examination, Graduation Requirements
614-292-6031
grad-schoolgraduationservices@osu.edu